YOU WILL NEED:
Your horse
Level ground
Camera
Saddle (your current saddle or a trial saddle from EQUESTRIAN IMPORTS, INC)
Chalk in a color that contrasts with the color of your horse
Flexible curve at least 16” in length (This is an architect’s flexible ruler. You can purchase one from an office supply or craft store or from the Accessories page of this website.)
8.5” x 14” piece of paper
Felt tip pen
Ruler
FOLLOW THESE 8 STEPS:
STEP 1
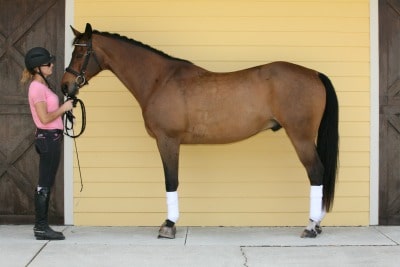
Stand your horse straight and square without a saddle with his LEFT side facing you on level ground against a solid background of a contrasting color as shown in the picture below. Step straight back from the middle of the horse’s LEFT side just far enough that you can see the whole horse in your camera’s viewfinder. Make sure that you are parallel to the horse and take the first photo. Then put on the saddle without a pad and girth it up as if you were going to ride. Again step straight back, make sure you are parallel to the horse and that you can see the whole horse, and take the second photo. After you take the second photograph, remove the saddle and proceed to Step 2.
STEP 2
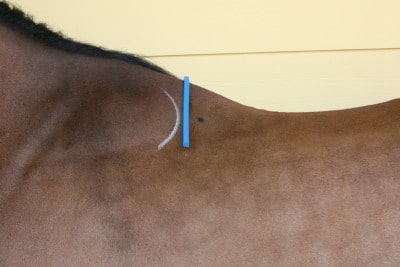
Still facing the LEFT side of the horse, locate the horse’s shoulder blade (scapula). With chalk, mark the back edge of the scapula. Then place the flexible curve on your horse’s withers behind the chalk mark as shown in the picture below. Be sure that the flexible curve is behind the shoulder muscle because you are trying to simulate where the saddle tree would sit on your horse’s back in order to allow for complete range of motion of the shoulder.

STEP 3
With the flexible curve lying directly on your horse’s withers, carefully mold it to follow the contour of the withers. Make sure the flexible curve does not pop up when you let go of it or this will yield inaccurate results.
 STEP 4
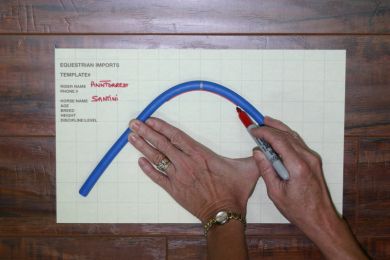
Gently remove the flexible curve from your horse’s back, center it horizontally on an 8.5” x 14” piece of paper, and trace the inside of the curve.
STEP 5
Label the wither tracing with the following details:
STEP 6
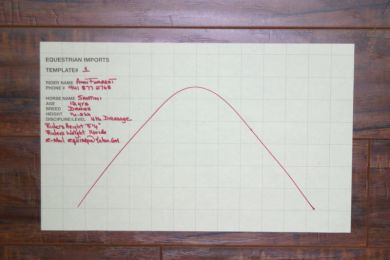
Make a mark at the top of the curve (Point A). With your ruler starting at the mark at Point A, measure down each side of the curve and make a mark precisely at 14.5cm (Point B and Point C) and then at 17.5cm (Point D and Point E). Now draw a horizontal line to connect Point B to Point C and another line to connect Point D to Point E. Measure each horizontal line as accurately as possible and write the measurement above the line.

STEP 7
If possible, scan your wither tracing, save it as a pdf file, and e-mail it as an attachment with your photographs to [email protected].
If you cannot e-mail your wither tracing and photographs, you can mail them to:
EQUESTRIAN IMPORTS, Inc.
1601 Bern Creek Loop
Sarasota, FL 34240
IMPORTANT: If you mail your wither tracing, it must be on a single sheet of paper. We cannot evaluate tracings that require assembly.
STEP 8
There is an Online Consultation fee of $175.00 for each horse/riding discipline (for example, dressage, jumping) saddle combination. When we receive your wither tracing, photographs, and payment, we will contact you promptly to arrange a convenient time for your consultation. The consultation will include our interpretation of your photographs and wither tracing, assessment of your saddle needs, discussion of saddle options, and our recommendations for saddles to try. Click here to pay the online consultation fee.
EXAMPLES OF SADDLE FIT:
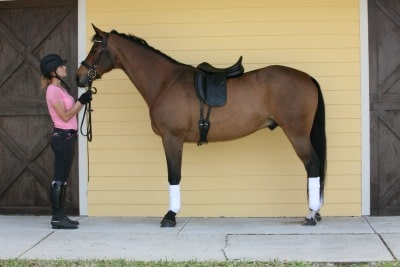
This saddle fits the horse correctly. It sits perfectly level behind the horse’s scapula, allowing the shoulder a full range of motion, with the girth positioned a hand’s width from the elbow.

This saddle is too narrow for the horse. It is sitting too high in the pommel (front) and too low in the cantle (rear). This improper fit results in the rider’s legs swinging out in front of the rider’s point of balance. It causes pressure points under the rear panel, affecting the weakest part of the horse’s back. “Bridging” is a common condition created by uneven distribution of weight and contact through the middle (waist) of the panel (padded area underneath the saddle that lies on the horse). There is too much pressure under the pommel and cantle and a gap where contact is interrupted through the middle. Lameness or behavioral problems in the horse may occur after repeated use of a saddle that is too narrow.
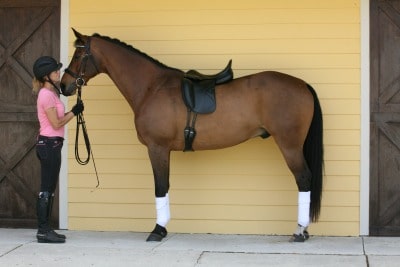
This saddle is too wide for the horse. It is sitting too low in the pommel (front) and coming off the horse’s back at the cantle (rear). This improper fit results in the rider’s legs swinging back behind the rider’s point of balance. It creates too much pressure from the front to the middle (waist) of the saddle. A “rocking” effect may result due to the uneven distribution of contact front to rear. Your horse will most likely become intolerant of the continuous shock his back will absorb from the unstable rear panels of a saddle that is too wide.